The Project:
This
project is a men’s cotehardie, from the 1370s.
I wanted a garment which would work equally well for outdoors (“hunting”)
and for less formal functions—not court clothing, but certainly not low class,
either. It is somewhat more modest in
length than the average for that time—however, as you can see in the German
Effigy, not everyone wore garments which showed off the majority of your legs.
Base
Sources:
I based the garment on several illustrations from the period. A couple illuminations of soldiers (or one soldier), and a German effigy. I don’t believe there actually are any finds of this kind of garment, beyond the Charles du Bloise pourpoint[i] (which is a silk gold brocade).
I based the garment on several illustrations from the period. A couple illuminations of soldiers (or one soldier), and a German effigy. I don’t believe there actually are any finds of this kind of garment, beyond the Charles du Bloise pourpoint[i] (which is a silk gold brocade).
%2BFolio%2B122R.jpg) | ||||||
| BNF Nouvelle acquisition française 15939 Miroir Historial (Vol 1) Folio 122r |
 |
Garment
Description:
This garment is a cotte or
cotehardie, the second and main layer of men’s clothing in the 14th
century. Cotehardies are somewhat
short—ranging from high-knee to mid thigh in length, generally getting shorter
as the century progresses. They are
typically closely fitted (depending on personal preference, like length) and
getting closer fitting as the century progresses—at least until the sleeves
begin to loosen in the 1380s (the body still remains close and short). It is not exactly a low class garment—other
than the skills required to make something this closely fitted being somewhat specialized, close fitting garments
by their nature waste fabric. It appears
that they were at least occasionally quilted.
 |
|
Men’s cottehardies typically
feature large quantities of buttons—the main source of decoration, other than
perhaps a luxurious silk brocade being used for the garment. In general, cottes would button all the way
down the front, as well as on the sleeves (sometimes up past the elbows[ii]!),
although examples of non-buttoning sleeves are evident in artwork (however, I
cannot discard the possibility that the artist simply chose to leave them off,
or that they are just not visible due to the angle).
Construction/Pattern:
The pattern is deceptively simple,
since I decided to not use the Charles de Blois (CdB). There is
essentially a back piece, two fronts, and the one piece sleeves (with a gusset
in the back). That is it; no gores. All the shaping is at the side seams and
front opening.
 |
| Charles de Blois Body. From Here. |
Even though I chose not to use the
CbD pattern, I did use it as the basis, simplifying it and eliminating the Grande
aissette sleeve style. Not only is
the majority of the narrowing for the waist at the side seam, but it is at the
back-side seam—the front-side seam is straight, at least until it begins to
flare out. The front edges curve out at
the chest, in at the waist, and then slants out slightly to the hem.
My
Goals:
My goal in this was to make a
garment to my taste which uses all (almost all) period correct material, and
the period correct methods of construction.
I was also trying to get fairly close to the inspiration images. I chose this style because I have actually
always wanted an outfit from this period—I think it looks good on me. I originally was trying to make this for the
Historical Sew Monthly Blue Challenge, back in
January…obviously, I did not succeed, but determined that it could work for the
War and Peace challenge as well, since one of my documentation pictures is of a
soldier.
Materials:
The main fabric is a 100% wool,
twill woven, flannel—the fabric is left over from my “Viking” poofy pants, in
fact (which I made several years ago, and have been saving the fabric for this
project). The fabric has been somewhat
fulled by washing. Lining is a medium
weight 100% linen, tabby woven. It seems
to me that the majority of the garments from this period (at least in Northern
Europe, where my interests are) are made of wool, and so that is the best
option. General consensus of the
Re-enacting community is that cottes need to be lined in a less stretchy
material—which would be usually be linen—to prevent distortion. Theoretically, a fabric which is far denser
would hold up without the lining; my material sadly does not quality.
The threads are where I fail. The majority of the construction is a
bleached white cotton thread—the period would be linen. The buttonholes and finish work should have
been stitched in a dyed silk thread—again, I chose cotton.
The main reason is availability—linen
and silk threads are not available in my town.
I could have ordered them online, but chose not to for my own
reasons. In addition, I really dislike
doing plain sewing with linen thread—I’ve found it breaks far too often, even
when heavily waxed; after being sewn, it is also nearly indistinguishable from
the cotton of the same shade. I do admit that a top quality linen thread probably would not have the breakage issues.
Seams:
The majority of the construction
was with a fine running (or technically, stab stitch, which I prefer)
stitch. In certain areas—the elbows and
around the armscye, mostly—I used a fine backstitch for strength. Both stitches are common to the period,
although theoretically in the case of the back stitch.[iii] The seam allowances were then felled to
either side with a whip-stitch going only through the linen flatlining, thus
encasing the linen, which easily frays.
The exception is the seam up the
back of the sleeve—in that case, the seam allowance is graded, and felled in
one direction (towards the top), and I turned the linen (which was on top of
the layers) and felled it separately.
For the first part, there is documentation in WitE[iv],
but the method for finishing the linen separately is my own.
 |
| Stab stitched then felled. Ignore the basting stitches. |
The neckline and cuffs are bound,
in the same wool as the shell. Evidence
of bound edges is somewhat inconclusive, and not particularly common, but does
exist[v]. I chose to do this primarily because I did
not leave enough of a seam allowance to turn it under and use a facing.
The front and sleeve facings are
linen, and are there to provide a extra layer to help stiffen the
openings. I stitched them on with a fine
stab stitch on the outside (both the wool and linen turned under), and an
overcast stitch on the inside.
In surviving period example of
facings (often the only recognizable part), the facing is often (but not always) a fine
silk. I chose not to, not because I
don’t have a silk which would work, but because that fabric is earmarked for
another project.
 |
| Front facing. The puckering is due to using a straight strip (there is no evidence of bias cut facings) on a curve. |
It now occurs to me that I should
have done a flexibility test with single turning the wool under to cover the
linen, then hemstitching that…
 |
| Singling. You can't see the stitches, but can see the effect. |
Drafting
the Pattern:
As I addressed earlier, I went off
of the CdB pattern. In all, the garment
has very little ease, at least down to hip level, so drafting is fairly easy
when you know the desired shape (which I did).
In addition, I have made a CdB gambeson in the past, and so was able to
go off of that. I found that by not
including the horizontal waist seam in the back, it (other than making it
difficult to get the waist close enough) gave me ease to bend over without the
back hem riding up. I went through two
mockups for this garment.
 |
| My worksheet, used to figure out the pattern before using fabric. |
It did take a couple of tries to
get the flaring and skirt circumference correct. Again, you want most of the hem to be towards
the back, otherwise it messes with the lines by causing the seam to stand out
at the sides. Likewise for the flare in the
front opening—it really needs to be almost minimal and not go out much further
than the chest curve.
 |
| The front. |
Something interesting I found was
that the back shoulder seam ended up being a full half inch larger than the
front shoulder seam—this is something you do see on modern coats (handmade
ones, anyways) to provide room for your back muscles to expand and move. I began to frantically research (thoroughly
enjoying the process), searching through the images in Medieval Garments
Reconstructed (which covers the Herjolfsnes finds), and Patterns of
Fashion (which is 16th century clothing). I measured the shoulders in the majority of
the garment patterns (using the extant outline in Medieval Garments) and
found that the difference between front and back was not unknown, in either
source (in PoF it was more common on a certain type of
doublet—unfortunately I cannot remember what, did not note it down, and
currently cannot find it on my FB timeline, where I had a discussion on the
subject. I suspect it had to do with the
decorations and whether matching pattern/trim at the shoulder seam was wanted).
 |
| The back, on the fold. |
The sleeves were a good bit more
difficult. I knew I wanted one piece
sleeves, which contain what I call an “elbow pocket”, and have a gusset. It also needed to have a fairly shallow cap,
to allow more movement. The other
challenge was that the hindseam needed to go over the top of the elbow, rather
than over the point (which could be uncomfortable). In part, I based my theories on the CdB, but
mainly on the G63, from the
Herjolfsnes find. Because there needed
to be an elbow pocket, the sleeve needed to be slightly wider at that point, so
I curved it out—on the underside of the sleeve.
This actually worked quite well, although I did use too much of an angle
coming down to the wrist, so the seam is slightly under the arm at that point,
rather than being where it should (over the ulna). Discussing the topic of sleeves with a co-conspirator, we came to the
conclusion that the wrist of the sleeve should be centered on the sleevehead
(assuming the hindseam is in a line with the elbow, or would be if not slightly
modified).
 |
| G63 sleeve |
 |
| Blue cottehardie sleeve. |
Construction:
Construction was actually fairly
simple. After drafting and testing my
mockups, then cutting the real fabrics, I basted. On every single piece, immediately after
being cut out, I basted all around the edges to keep the linen and wool
together.
Side seams were sewn, then the
shoulder seams. I then cut the sleeves
out—it is my practice to wait until it is time for them to go in, in case
modifications need to be made.
At
this point I checked the fit of the shoulder (more basting) and found that
somehow the back got widened by approximately 2-3 inches—so the shoulder seam
was not where it was supposed to be (I suspect it was due to cutting on the
fold with a springy fabric). I
discovered this when I basted the sleeves in and found them too long, even
though their measurements were correct.
The offending material was removed (after a due amount of
procraftinating), and the sleeve fitted back in. I also had to take in the side seam by ½ inch
total (on each side) because when that seam is not close enough to the body it
affects how well you can raise your arm.
Front
facings were next, followed by the sleeve facings, and binding the
neckline.
Buttons/Buttonholes:
The
most enjoyable (I am actually not being sarcastic) part was next—making the
cloth buttons. I used the standard
method[vii],
slightly modified. Rather than cutting
circles—which takes longer, and wastes fabric—I use squares. The standard method is to take your little
squares, run a circular line of running stitches around the edges, and pull the
thread to gather. You use a bodkin to
tuck the corners into the little pocket thus formed, then gather the edges
together again, and run stitching across repeatedly until they are round. The front buttons are made of 3.5cm squares
of the wool, giving a 12mm finished button size (approximately); the sleeve buttons
are from ¾ inch squares (before being trimmed of the fuzz), and gave a 7mm button size.

Based
on the London finds, the sleeve buttons are on the upper end of find sizes,
with 3-6mm[viii]
being common. My front buttons on the
other hand are average to the upper end, based on buttonhole size[ix]—however,
round buttons for the front don’t seem to have been found, just flat cloth
buttons (which are slightly to quite a bit larger). I cannot imagine how a 3mm cloth button can
be made.
 |
| From Textiles and Clothing. |
Once
all the buttons were made, it was time for the buttonholes. For the front opening, I decided to use ¾
inch intervals down to the hips, then 1.25 inch intervals from there to the hem. These measurements were decided mainly by
aesthetics. The sleeve buttons are at ½
inch intervals, again for aesthetics (and because I really didn’t want to do
more)—this is conservative compared to many examples (which would have
approximately twice as many buttonholes)[x].
 |
| Sleeve buttonholes. I made the sleeve buttonholes rather large, actually. This was intentional--if I made them the correct size, I might not have been able to actually button it when worn. |
 |
| Front buttonholes, somewhere near the waist. |
I
followed the tutorial on Cotte Simple for construction. There are several
differences between medieval buttons, and more modern (or completely modern
ones), chiefly that there is no radial stitching on the ends, much less a
punched hole. The threads are not packed
right next to each other—there are small gaps—, and there is no evidence of bar
tacks on the ends or stitching to hold the layers in place while stitching[xi]. The last set of differences is that they seem
to be worked from the wrong side of the fabric, with the needle entering the fabric
at an angle towards the slit, which it then comes up through (and the stitch is
completed). This is based on the
observation that the visible stitches are far wider on the wrong side of the
garment.
 |
| From Textiles and Clothing. |
Modern
(say, starting in the 1700s) buttonholes are worked from the right side, with
the needle being worked through the slit, then up through the fabric; the
stitches are always packed tightly with no gaps. Sometime in the Victorian era the hole was added
for the button stem. I have not yet
studied Renaissance buttonholes, so cannot speak for differences with them.
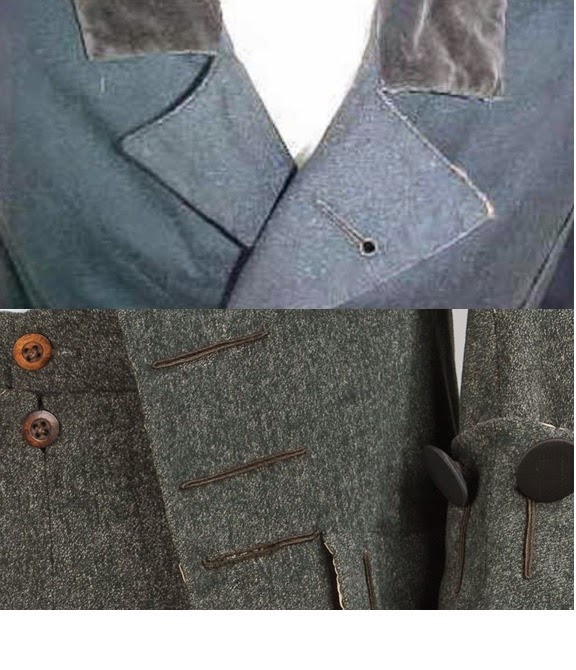 |
| For those curious. Top: 1840 Frock coat Bottom: 1750 Justaucorps |
I
stitched the buttons on after finishing the buttonholes—that task is fairly
simple; just run a thread multiple times between the bottom of the button and
the edge of the fabric, then wrap the stem.
 |
| Finished front buttons. Basting threads still in place. |
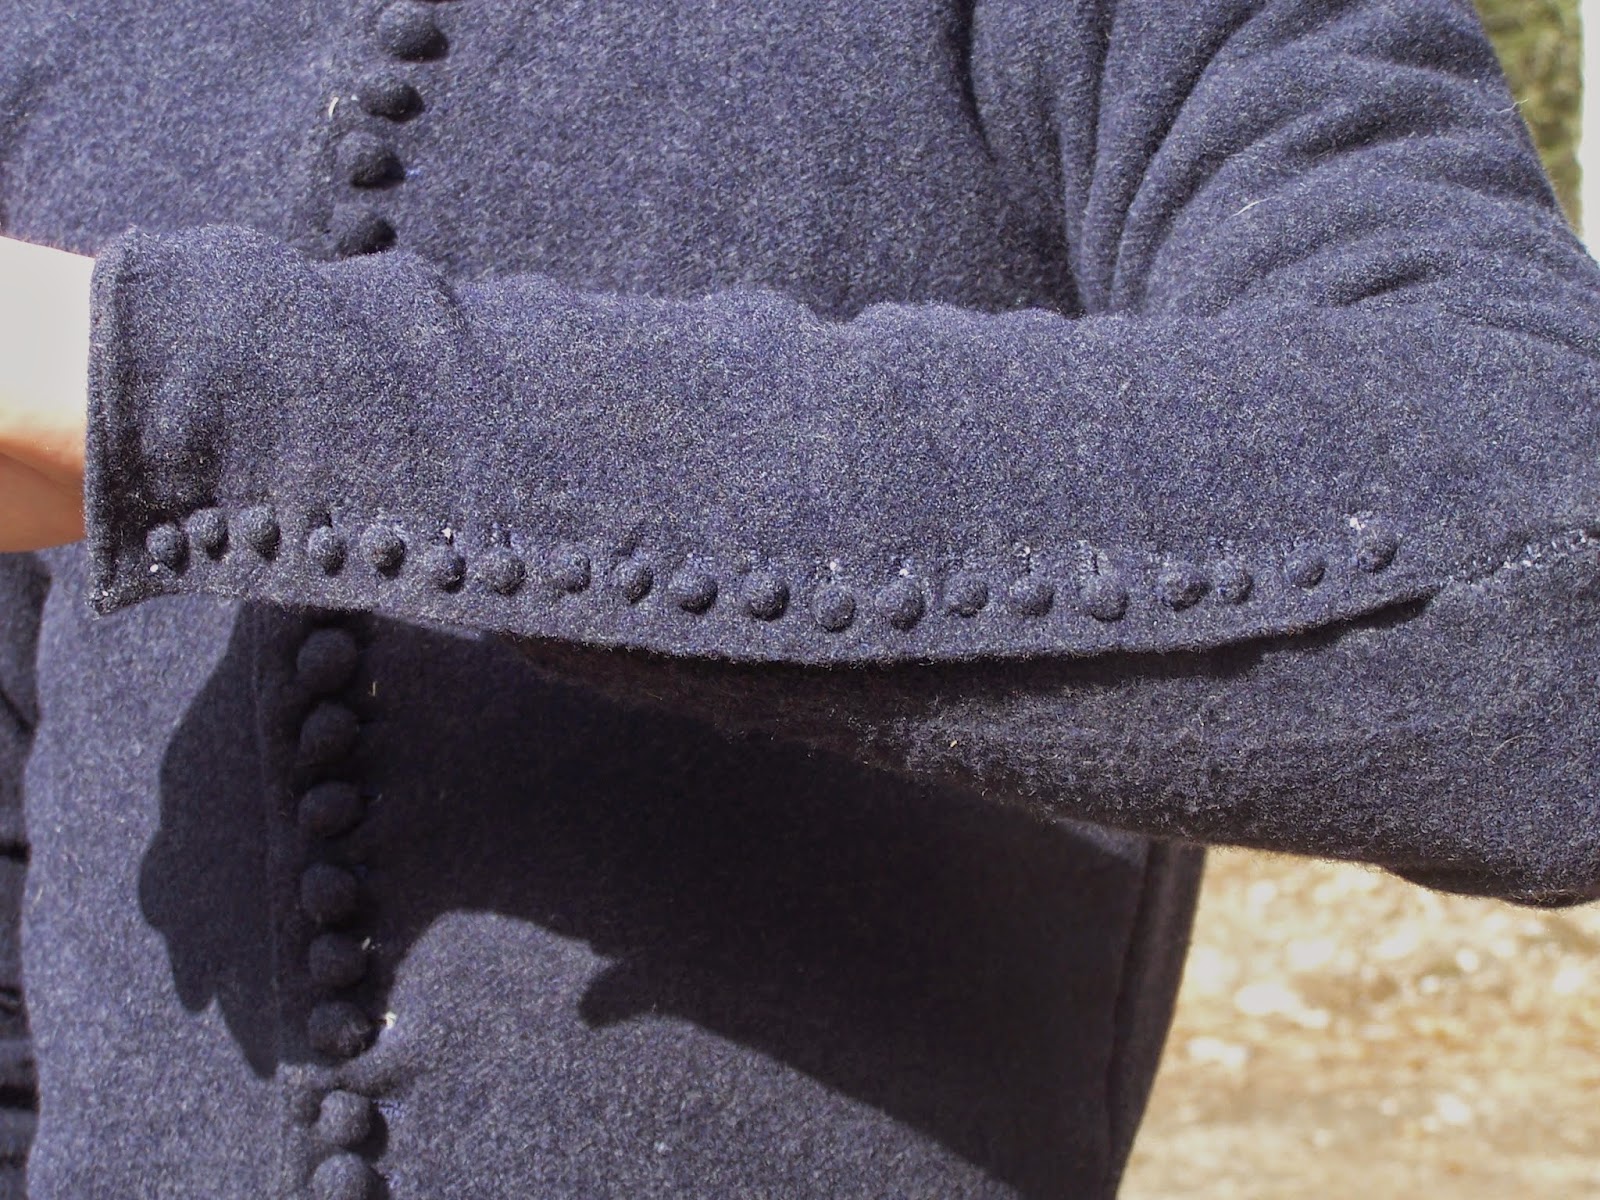
 |
| A sleeve. |
 |
|
The
last step was to hem, in two stages, then cleanup (removing all basting
stitches).
What
I learned:
This was actually a fun project,
however much I may have been complaining about parts of it. In the process, I learned more about buttonholes;
the whole thing with the differences between front and back shoulders. The way for making tiny buttons (that works
for me, at least)—I should experiment with how small I can make them…
What
I’d do differently:
Not much, actually. The hem is one possible major exception. The other is to pay more attention—I made a
major mistake due to…to be honest, stupidity; I will discuss this in an
appendix. I also probably should have
made the armcye slightly larger.
Now I need chausses and a plaque belt...
Now I need chausses and a plaque belt...
 |
| Ah, yes. Alaskan pale--an eye blinding white... |
 |
| Trying to be an effigy. |
Historical Sew Monthly
The
Challenge: April – War and Peace. This garment is from firmly in the middle of the 100 Years War, right after the first peace ended. In addition, one of my source illuminations is of a soldier.
Fabric: Wool and linen.
Pattern:
My own, based on the Charles du Blois.
Year:
1370s
Notions: Thread (embroidery floss)
How
historically accurate is it?: 96% or so.
As said above, the fabrics, methods of construction, and (theoretically)
pattern are period correct. The threads,
on the other hand, are not.
Hours
to complete: 71 hours, 45 minutes. This does not include drafting and mockups.
First
worn: Not yet.
Total
cost: Maybe 40-50 US dollars? The wool was from my stash and cost 10-15$ a
yard (I think). 3 yards of linen at 5$ a yard was purchased specifically for
this project.
Bibliography:
Crowfoot, Elizabeth; Pritchard, Frances; Staniland, Kay.
Textiles and Clothing 1150-1450. Boydell Press, revised edition (2004). Abbreviation: Textiles
Ostergard,
Else. Woven into the Earth.
Aarhus University Press, 2nd edition (2009). Abbreviation: WitE
Fransen,
Lilli; Norgaard, Anna; Ostergard, Else. Medieval
Garments Reconstructed. Aarhus
University Press, (2011). Abbreviation: Recon
Arnold,
Janet. Patterns of Fashion 3.
Quite Specific Media Group, Ltd (1985).
Abbreviation: PoF
Tremayne,
Merouda. 14th Century Garment
Construction Techniques. https://medievaltailor.files.wordpress.com/2012/10/sewing-techniques-paper1.pdf
[Accessed 4-30-15]. Abbreviation: Garment Construction
Carlson,
Jennifer L. Sewing Stitches Used in
Medieval Clothing. http://www.personal.utulsa.edu/~marc-carlson/cloth/stitches.htm
[accessed 4-30-15]. Abbreviation:
Stitches
Kelly,
Tasha Dandelion. How to Sew a
Medieval Buttonhole. http://cottesimple.com/tutorials/how-to-sew-medieval-buttonhole/
[accessed 4-30-15]. Abbreviation:
Buttonhole
Kelly,
Tasha Dandelion. Articles
(articles on the Charles de Blois). http://cottesimple.com/articles/
[Accessed 4-30-15]. Abbreviation: Kelly
CbD
Unknown. Pourpoint of Charles de Blois. http://www.forest.gen.nz/Medieval/articles/garments/Charles_blois/Charles_blois.html
[accessed 4-30-15]. Abbreviation: CdB
Pourpoint
Museum page for the Charles de Blois
http://www.culture.gouv.fr/public/mistral/joconde_fr?ACTION=CHERCHER&FIELD_98=TECH&VALUE_98=baudruche%20&DOM=All&REL_SPECIFIC=3. [Accessed 4-30-15]
[i] Kelly
CbD
[ii] CdB Pourpoint
[iii] Textiles (pp. 156)
[iv] WitE
(pp.98)
[v] Textiles
(pp. 158)
[vi] WitE
(pp. 99)
[vii] Garment
construction (pp. 3)
[viii] Textiles
(pp. 172)
[ix] Textiles
(pp. 171)
[x] Textiles
(pp. 168)
[xi] Textiles
(pp. 170)
Appendix One: Mistake
I made a serious mistake at one
point—one which put me behind by 7.5 hours of work. I sewed the sleeve buttonholes on the wrong
side of the sleeve (the bottom seam, rather than the top). Naturally, this was not discovered until I
began stitching the buttons on.
My
solution was to remove the strip containing the buttonholes, and patch it. After cutting the portion out, and cutting my
layer of wool and two of linen (one was the facing), I stitched the turn for
the facing. Next was to sew the entire
strip in place and turn, fell the seam, and then hemstitch the new facing in
place.
The last step is something I later
found out is called Rantering the Seam. I cannot document this to period, but here is
the process. Basically, after patching,
use a blind stitch or whip stitch to bring the top fibres of the fabric
together over the seam. Moisten the
surface and tease the fabric to raise the nap, then felt the fibres together
over the seam (make sure your hands are completely clean…). The last step is to shave the nap, once the
fabric is dry.
 |
| Excised. |
 |
| Forming the piece which will be inserted. When handsewing, I work away from me, and use a bottle as a weight to put some tension on the fabric. |
 |
| All sewn in. |
 |
| Rantering the seam. |
 |
| Teased. I don't seam to have one of it after felting/shaving. |
©
John Frey, 2015. The Author of this work retains full copyright for this
material. Permission is granted to make and distribute verbatim copies of this
document for non-commercial private research or educational purposes provided
the copyright notice and this permission notice are preserved on all
copies. Photographs of my work may not
be duplicated.
No comments:
Post a Comment