Part One was the shell and patterning,
Part Two was about putting it together (at least up to the halfbody) and tailoring.
Part three, on the other hand, will be the pockets and hopefully finish work--unfortunately I didn't take nearly as many photos as I should have at that point.
And for the fun part, pockets. I actually enjoy making them, in a mildly masochistic way--especially jetted pockets.
I estimated the breast pocket location, but kept it near the bottom of the scye--I probably should have lowered it a tad more--around 3/4 inch--, since the scye is so high and tight in this garment.
I--more or less--
follow this method for my single welt pockets. The interesting part of what I am going to show is how I pattern matched over the quilted pieces.
The first order of business was to cut a welt pattern from paper on the fold, not including the seam allowances (but including the extra length which gets turned under). I then marked the seam and notable parts of the fabric, including which way the twill was running.
The paper was cut along the seam line, unfolded, and used as a template. Pattern matching only mattered on the front part. I also marked little arrows pointing out on each seam which required the allowance to be added, in order to help keep me from forgetting.
The welt was sewn together, had the seam allowances pressed, then was heavily pressed in half lengthwise. Then the bottom seam was lined up with the bottom seam line, basted in place, then sewn.
Pocketing material sewn on, both to the bottom (back) edge of the welt, and along the top line.
The flap was also sewn on under the top pocketing. Next time, unless doing a flapped, jetted pocket, I'll apply the flap as a separate entity.
Pocketing cut, turned, seams finished, etc.
Same as the above. Almost managed perfect matching. It is off because I didn't make the welt long enough to easily turn under, so I had to finagle it.
I decided to get crazy, and take the pattern matching to the extremes. You can see all the seam lines here, plus the markers for the fabric weave--particularly important since many of the squares were cut slightly off grain.
All the pieces cut out. Obviously I had lost what sanity I previously possessed. A single welt, piped on the top and bottom of the welt, pattern matching across five pieces of fabric? Completely bonkers.
I didn't do
too badly--it could have gone far worse. However, I'm grateful that the woolens I made it out of could be shrunk to fit.
But in the end, I decided to just pattern match simply, with only four pieces. The back of the skirt is to the left.
A closeup of the welt, and the bar tacks on the end. The top pocket--while not a secret--is mostly hidden; it shares the flap with the main hip pocket. I believe that all future coats like this will have the "secret" hip pockets as well--they are great for keys.
I tried to pattern match the plait pockets as well...didn't work as well. To do so, you would have to sew (or baste) the skirt to the back through a piece of paper, then go trace and pattern on that.
And in the end, I decided to use flaps out of my accent tweed.
Same as the hip pockets. By this point, I was running out of this fabric, and had to piece the pocket down the middle.
I...um...may have gone slightly overboard on the inside pockets. Again. To be fair, several of them were for specific items. They are standard constructed, jetted pockets. I use the method outlined in the tutorial from
HERE. I used recycled fabric from the linings of the source coats for my pocketing--worked quite well, but I don't enjoy working with that slippery fabric.
However, in the future, don't place them so close to the side, and offset the pen pocket from the notebook pocket (the middle set on the right) because that's just uncomfortable. And I do not recommend using so many with a close fitting garment--the only reason the contents don't deform the coat horribly is because there is a layer of canvas between the contents and fashion fabric, so it gets smoothed out.
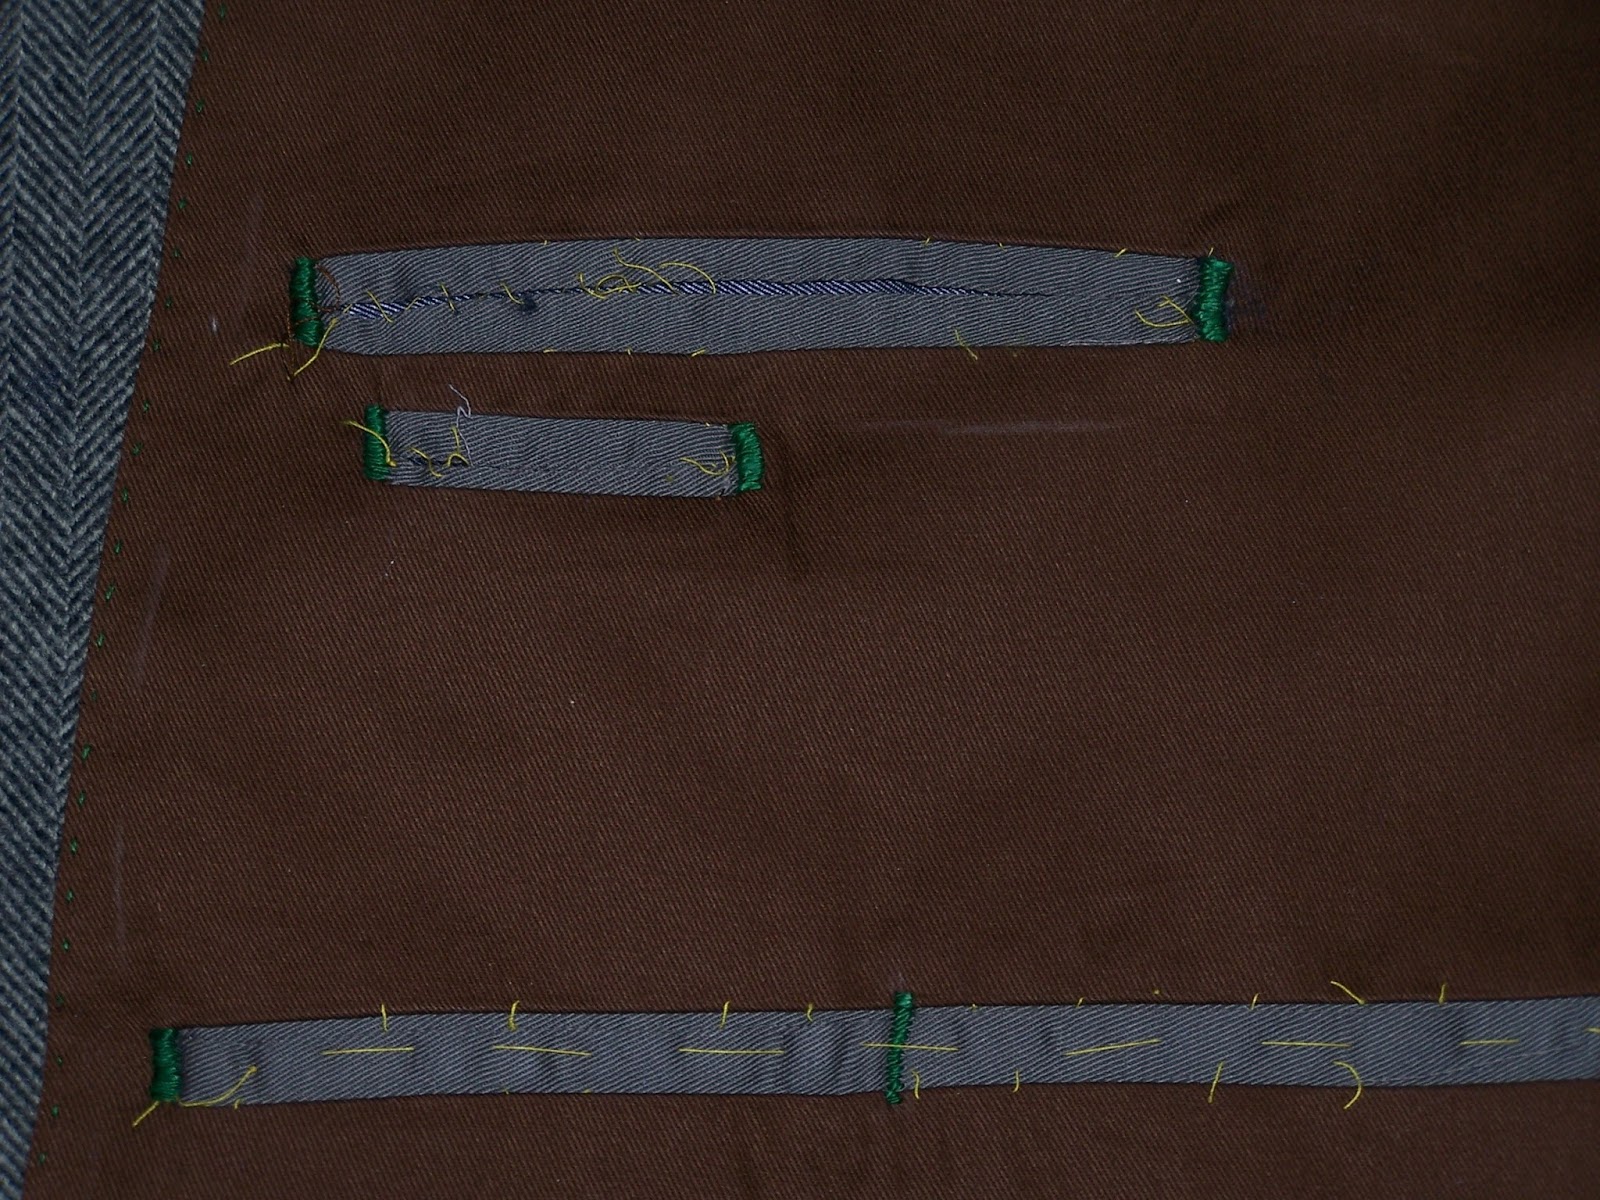
The overstitched bar tacks on the end of each pockets. The one in the middle of the long pocket is because the pocket itself is divided in two.
When you are working with a coat,
always baste the pockets shut until construction is complete.
I am more or less not even going to try to describe the remaining without pictures--I don't believe my descriptive abilities are up to it, and you--the reader--would be faced with a somewhat boring wall of text.
Instead, I will go on to Part Four--an overview of the project, what I learned, how long it took....and my (highly recommended) list of steps in order (I departed from the order, of course).
I will say that when it came to installing the skirt lining, I more or less followed the
directions HERE.
©
John Frey, 2015. The Author of this work retains full copyright for this material.
Permission is granted to make and distribute verbatim copies of this document
for non-commercial private research or educational purposes provided the
copyright notice and this permission notice are preserved on all copies. Photographs of my work may not be duplicated.


No comments:
Post a Comment