They are slightly out of order, in a way--Part One dealt with the construction of the pattern and shell. Part Two is the internal structure; Part Three will be pockets and finish work--however, in reality parts were done concurrently; for instance, the breast pocket was completed before sewing the body pieces together.
You can see the layers of canvassing and batting here. From bottom to top; standard pattern chest canvas, on the straight of grain; second layer of canvas, cut on the bias (this layer is barely visible); Chest and shoulder padding, which follows the second layer of canvas; then a second layer of padding, directly over the chest to accentuate.
Note that they are graded to layer out the bulk.
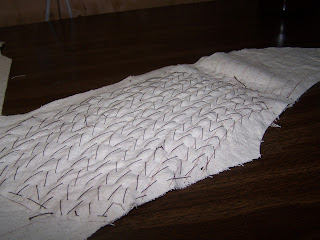
At this point, I have them layered as chosen--with the batting between the two layers of canvas to protect it--and basted around the edges. The lines for stitching roughly follow the curve of my chest, and do not go up past the collarbone.
The pad stitching finished--you can see the permanent curve I gave the fabrics. In the hollow of the shoulder, I reversed it, stitching perpendicular to the chest curve, and on the other side so it would fit the hollow just below the collarbone.
This was experimental, but seems to have worked fairly well.
The more or less mirrored pieces--I had issues keeping them even, obviously, due to having work from different sides (the one on the left was done first). Incidentally, pad stitching is actually my favourite part of sewing a tailored garment--I think it's the idea of permanently shaping fabric, using only thread tension.
One padstitching tutorial, from Garb For Guys. Note; it doesn't matter whether your stitches make 'V's or all slant the same way. Personally I prefer 'V's as it means I am working up and down, without turning the fabric.
And another, aimed at the roll line of the collar.
The revers. At this point, the canvas underlining was added, and that is what you see stitched. The front canvassing was basted to the underlining.
Plait pockets installed (that was a trial in itself, but will be discussed in the next installment), and skirt sewn to the vent side.
I've gotten the front and sidebody attached to each other, then the sidebody attached to the back. The waist seam has not been sewn yet, as you might guess...
That section of the back sidebody seam was a serious pain--I had to redo it 4-5 times in order to get it to come close to matching up. But I managed in the end--remember that basting is your friend, and basting in multiple directions helps.
Much pressing--on the ham!--was involved.
I did have to redo the plait area multiple times, removing fabric from the sidebody, in order to make it drape correctly. In addition, at some point in here I did a fitting and decided to add a fish (between the 3rd and 4th columns of patches, from the front).
And closeup of the join.
And the collar. I use a two piece collar pattern, and drape to find the fall line. Here, you can see the first couple lines of prick stitching.
I didn't feel like any of the coat fabrics would work for the undercollar--either they weren't heavy and thick enough to hide the stitches, or were too loose (those real Harris tweeds), so chose a woolen of a tighter weave, and complimentary colour from my stash.
Prick stitching completed.You are looking at parallel stitches in lines, which result in supportive quilting lines (more visible below)
The quilting lines that support the collar stand.
I've begun pad stitching the fall. This is only with a few rows, and you can see how much it shaped the collar. I begin the first row right on the top of the stand; this way the crease begins on the marked fall line.
I was doing much of this where I was house-sitting at the time...and forgot my tailor's ham. So I improvised; a football dog toy, a heavy towel, and a tire shaped dog toy as a base...it worked fairly well, actually.
Once the body was together in halfbodies, I could start on the lining. I had previously cut it out using the shell as the template. However, I added a pleat at the front shoulder (barely visible) to allow movement. The facing is the densely woven wool twill.
Here it is just basted and pressed, with the lining over the facing. Before hand stitching it down, I marked off all the pockets (the faint white lines). This was important to ensure I didn't cut through my handstitching and have it come undone.
Sewn with a backstitch in contrasting thread. The sidebody and back were sewn in normally--however, the back vent--the tails--were made as a separate piece and sewn down to the vent facing.
©
John Frey, 2015. The Author of this work retains full copyright for this
material. Permission is granted to make and distribute verbatim copies of this
document for non-commercial private research or educational purposes provided
the copyright notice and this permission notice are preserved on all copies. Photographs of my work may not be duplicated.


No comments:
Post a Comment